Documentation
1. Core concepts
2. Guided Install and setup
2.1 The Installer
2.2 The Web Setup
3. Manual install and setup
3.1 Esp8266
3.2 Esp32
3.3 Raspberry Pi
3.4 Other platforms
4. Developing your Apps
4.1 The worker and management tasks
4.2 Code examples
5. Security aspects
6. APIs
1. Core concepts
In Pythings, a Thing is a device directly connected to the Internet (i.e. using WiFi and not Bluetooth). Each Thing has a Thing ID (TID) which is a unique identifier for the device.
An App is a a set of Python code files that run on the Things under PythingsOS supervision. Apps have to implement a worker task and a management task, which can be developed using the Web-based code editor.
The worker task is in charge of carrying out some work at given intervals like reading a sensor, while the management is supposed to handle commands sent to the Things via the Cloud, like turning on an actuator. Apps are not supposed to communicate with the external world by themselves: instead, they send and receive data to and from PythingsOS, that in turn communicates with the Cloud, which is where you can get and send data from and to your Things.
Apps have settings:- the worker interval, the time in seconds to sleep between calling the worker tasks;
- the management interval, the time in seconds to sleep between calling the management tasks (and checking for settings updates from the Cloud);
- the App code version to use on your Things, which can be set to "latest" to always use the latest commit or to a specific commit or tag (and that will trigger an App remote update when something changes);
- and the Required OS version, which is the PythingsOS version required by the App (that can also be set to "factory" to just use the PythingsOS version you installed on your Things). Note that requiring a PythingsOS version newer than the one already installed on your Things will trigger an OS remote update.
Once the App is created it will be given an App ID (AID), that you will use to associate your Things with the App, either using the Web Setup or by setting it manually (more info in the manual install and setup paragraphs).
2. Guided install and setup
2.1 The installer
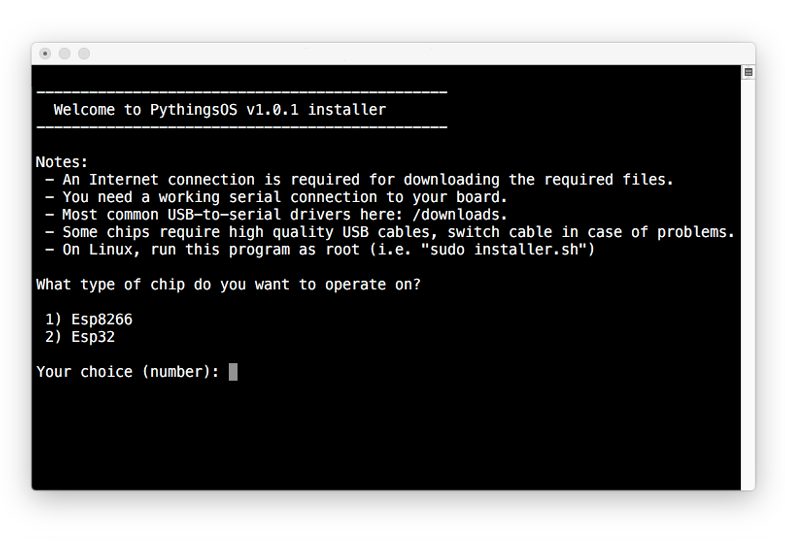
The installer allows to get you started straight away without worrying about tools, dependencies and firmwares. It will prepare your board for PythingsOS, download the code and install it.
It runs on Windows, Mac and Linux with no requirements other than Python and a USB/Serial connection with your board. Currently, it supports only boards based on the Esp8266 and Esp32.
You can download the installer following the link at the top of the downloads page. You will also probably need the USB to serial adapter drivers, you can find the most common ones for the boards equipped with the esp8266 and esp32 in the last section of the downloads page as well.
If your board is not supported by the installer yet, or if you want to manually install PythingsOS on the board, you can follow the instructions in the manual install and setup section below.
2.1 The Web Setup
Once you successfully installed PythingsOS on your board, it is time to configure it. This mainly means to setup the WiFi newtork and to link it with your Account or one of your Apps. This step cab be entirely performed with the Web Setup.
When PythingsOS boots, your Thing will stay discoverable as a Wi-Fi access point for about a minute in Web Setup mode. If in this time span you connect to this WiFi network with the Web Setup page opened in your browser, your will lock it in this mode and you will be able to configure it. If no incoming connections are detected, the normal operation mode is resumed. The Web Setup mode is started every time you hard-reset the device, either by powering it off and on or by using the reset button.
To start the Web Setup process, first of all open the Web Setup page located at http://backend.pythings.io/websetup/ in a new tab (do not use SSL and do not use Chrome since it deprecated support for Private Network Access, use Firefox or an alternative browser [1] [2] [3] [4] ). Then, reset your Thing and connect to the WiFi network named "Thing_XXXXXXXXXXXX" with password "NewThing" (where the XXXXXXXXXXXX is a unique identifier of your device, usually the Mac address).
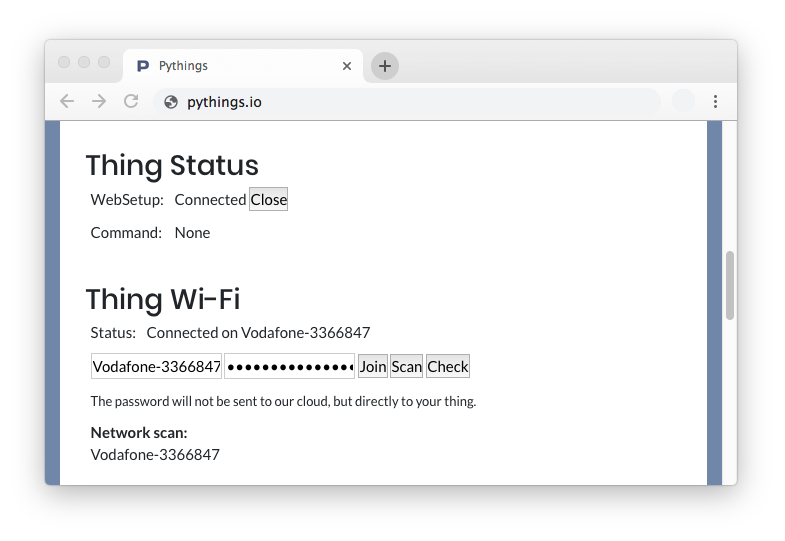
In the Web Setup page (which must be already loaded before switching network) you should now see the device as connected. You can scan for WiFi networks, join your network and check the connection status, and set the AID to either your Account ID or to one of your Apps ID. Once you are done, close the Web Setup mode with the "Close" button or reset the device, otherwise it will get stuck in this mode.
Note: if you link the board with your account instead of a specific App, you will be able to install and uninstall your App directly from the Pythings Cloud. Otherwise, you will have to re-run the Web Setup to change the App.
Note: you can configure PythingsOS even via a serial connection and the command line, read more in the manual install and setup below.
After configuring and resetting, you should see your Thing appear in your dashboard. If you linked your Thing with your account, you can now install an App on it, while if you directly linked it with an App, it will be automatically pushed to PythingsOS.
3. Manual install and setup
3.1 Esp8266
To install PythingsOS on the esp8266 you can choose between two firmwares: the standard or frozen versions. In the frozen version, PythngsOS is byte-compiled into the firmware itself and cannot be updated remotely, but there is more memory available for your App and SSL is supported. We suggest to use this version if you don't need to deploy your Things in the filed. You can also choose to use the esp-12 variant of the firmware, which supports the status LED trough a different implementation of the Hardware Abstraction Layer. The "Witty Board" and the "NodeMcu" boards come with an esp-12 onboard. You can download the firmwares in the varius versions in the downloads page.
To flash the firmware on the esp8266 you will need the Esptool utility. This is a small Python package utility that you can install via "pip install esptool". The syntax for erasing and flashing the internal flash with MicroPython is as follows:
$ esptool.py --port /path/to/serial/port erase_flash
--- wait a bit, like 5 seconds ---
$ esptool.py --port /path/to/serial/port --baud 115200 write_flash --flash_size=detect -fm dio 0 your_firmware.bin
...where /path/to/serial/port is the path of the serial port where the esp8266 is connected ("/dev/cu.wchUSBserial1410" and "/dev/ttyUSB0" are respectively an OSX and a Linux example), and that your_firmware.bin is the name of the firwmare you downloaded at the previous step. After flashing MicroPython on your board, reset it (using the reset switch or by unplugging the USB/power cable). If you are using a terminal over the serial connection, you should see PythingsOS booting up. You can now access in Web Setup mode and configure the device. The ID of the device (or TID) on the platform will be its MAC address.
Note: to install PythingsOS you will need a flash of at least 1 MB. Some early version of the esp-01 have only 512 Kb and are therefore not suitable.
Note: if you can't connect to your board, either you do not have the right driver installed or the cable is not suitable. Keep in mind that the some boards are particularly picky with USB cables, and you will probably need to try a few before fining a cable that works.
3.2 Esp32
There are no standalone PythingsOS builds for the Esp32 yet, therefore the procedure is to install it manually on a vanilla MicroPython, the the "kernel" on which PythingsOS is built on.
MicroPython is a firmware and needs to be flashed on the device's internal flash. You will need a serial connection to the device and the MicroPython firmware, downloadable both on the MicroPython website and in the downloads page. Each PythingsOS version supports a specific version of MicroPython, so check carefully before downloading.
To flash the firmware on the esp8266 you will need the Esptool utility. This is a small Python package utility that you can install via "pip install esptool". The syntax for erasing and flashing the internal flash with MicroPython is as follows:
$ esptool.py --port /path/to/serial/port erase_flash
--- wait a bit, like 5 seconds ---
$ esptool.py --chip esp32 --port /path/to/serial/port write_flash -z 0x1000 firmware.bin
...where /path/to/serial/port is the path of the serial port where the esp8266 is connected ("/dev/cu.wchUSBserial1410" and "/dev/ttyUSB0" are respectively an OSX and a Linux example), and that your_firmware.bin is the name of the firwmare you downloaded at the previous step. After flashing MicroPython on your board, reset it (using the reset switch or by unplugging the USB/power cable).
Note: if you can't connect to your board, either you do not have the right driver installed or the cable is not suitable. Keep in mind that the some boards are particularly picky with USB cables, and you will probably need to a few before finding a cable that works.
The next step is to copy all the required files in the "/" directory, PythingsOS will then start as if it was installed in pre-built version. To do so, we reccomand using ampoy Adafruit MicroPython Tool (ampy) or uPyLoader. Connect to the serial port of your board (i.e. "/dev/cu.wchUSBserial1420") with baud rate 115200, and copy every file in the zip file into the root (where you will find boot.py, that you need to overwrite with the one in the zip archive).
After having successfully copied all the files, reset your board (using the reset switch or by unplugging the USB/power cable). If you are using a terminal over the serial connection, you should see PythingsOS booting up. You can now access in Web Setup mode and configure the device. The ID of the device (or TID) on the platform will be its MAC address.
3.3 Raspberry Pi
You can find a RaspberryPi version of the PythingsOS codebase in the downloads page, which once unzipped should work out of the box. This version, almost identical to the "Platform-independent" PythingsOS version, does not yet support the WebSetup mode.
3.4 Other platforms
This procedure explains how to run a generic Python PythingsOS build for a Unix platform, the only requirement is Python 3. You should be able to run it on other platforms (like Windows) by just slightly modifying the "run.sh" script.
This version of PythingsOS requires two configuration files, one named "aid" containing your Application ID and another one named "tid" containg a unique identifier for your "simulated" thing (Thing ID). As TID you can use a unique identifier of your choice (your MAC address is the most immediate one), and we remind you that if you do not yet have an AID you can create you first App here. These files are expected to be found in a folder named ".pythings" in your home folder (i.e. /Users/yourusernmae/.pythings) on a Mac system. The following is the summary of the commands you need to type in a terminal:
$ mkdir $HOME/.pythings
$ cd $HOME/.pythings
$ echo "your AID here" > aid
$ echo "your TID here" > tid
To run PythingsOS, just uncompress the archive, enter the "Python" directory and type the command "./run.sh". The following is the summary of the commands you need to type in a terminal:
$ unzip PythingsOS_v0.2_Python.zip
$ cd Python
$ ./run.sh
4. Developing your App
Devolping an App for PythingsOS means to write a worker and a management task, which are called every worker interval and management interval as introduced in the core concepts. The worker and management tasks create by defualt when you create a new App are just empty stubs, The worker sends no data to the Cloud, and the management just replies to management commands with basically an "echo".
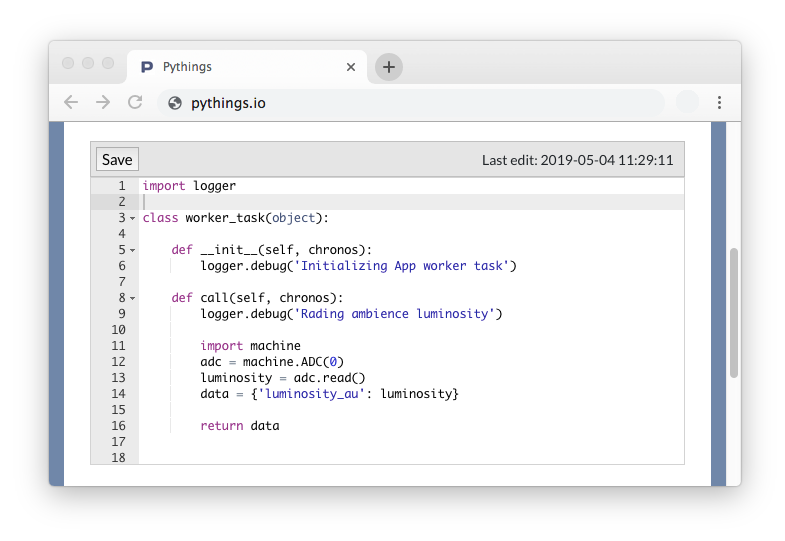
To edit the code for your worker and management tasks, you can use the Web-based Code Editor. This is available in the App dashboard under "Actions". You can enable using the latest version f your App in the settings and set the management interval low (i.e. 5 seconds) so that every time you commit a file in the Code Editor the changes will be pushed to your Thing(s) almost immediately.
For quick experimenting, you can either use the remote shell (where you can sent one-line Python commands) or connect with a serial cable to your board, experiment with MicroPython, and then paste the code back in your App. A full remote shell and a live remote code editor are work in progress.
To interact with your App (like visualizing sensor data or sending management commands) you can use both the dashboards (including the message dashboard located under the "Diagnostics" section of yor Thing dasboard) and the REST APIs.
Note: the memory available for your App on the esp8266 is extremely low (around 12 Kb), so you will most likely encounter memory errors along the way. The available memory can increase to around 24 Kb if you use the frozen version of PythingsOS, but keep in mind that by using it you will not be able to update PythingsOS remotely.
Note: There is also (limited) support for OEM mode, which lets you to distribute Things already linked with an App (and that lets you also use custom graphics for the Web Setup process). You can read more in the manual install and setup section.
4.1 The worker and management tasks
The worker task...
The management task
4.1 Code examples
The following are examples for the esp8266 Witty Board (but they can work with any board and any platform) for reading the luminosity sensor, activating the RGB led and reporting the free memory. You will be basically able to send management commands for setting color and intensity of the RGB led (with strings like "red:1000,green:100,blue:500" and "green:on") or for getting the memory status (with the command "meminfo"), and that samples the luminosity using the integrated luminosity sensor.
The worker task:
class WorkerTask(object):

    def __init__(self):
        pass

    def call(self):

        import machine

        adc = machine.ADC(0)
        luminosity = adc.read()
        data = {'luminosity_au': luminosity}

        return data
..and the management task:
class ManagementTask(object):

    def __init__(self):
        pass

    def call(self, data):
        if data:
            if ',' in data:
                commands = data.split(',')
            else:
                commands = [data]
            for command in commands:
                if command and ':' in command:
                    command,value = command.split(':')[0:2]
                if command == 'meminfo':
                    import gc
                    return str(gc.mem_free())
                elif command == 'red':
                    pin=15
                elif command == 'green':
                    pin=12
                elif command == 'blue':
                    pin=13
                else:
                    return 'Command not valid'
                if value == 'on':
                    value = 1000
                elif value == 'off':
                    value = 0
                else:
                    try:
                        value = int(value)
                    except:
                        return 'Command argument not valid'
                    if value < 0 or value >1000:
                        return 'Command argument not valid'
                if command:
                    import machine
                    machine.PWM(machine.Pin(pin)).duty(value)
                return 'Executed'
5. Security aspects
When hardware is powerful enough, SSL is supported and active by default. Not that the backend key is still not validated, which means that the connection si prone to man-in-the-middle attacks.
When the hardware is not powerful enough or to add an extra layer of secutirity including key validation, Payload encryption might be an interesting option. Payload encryption means that plain http requests content is completely encrypted with AES 128 (with the exectpion of session token), and that key exchange is secured by RSA 1024. It works as follows:
- When a device powers on, it generates a 128 bit AES key;
- The AES key is encrypted using Pything's 1024 bit RSA public key;
- The device pre-registers itself on the backend sending the RSA-encrypted AES key;
- The backend decrypts and store the device's AES key, and generates a session token which is sent back (encrypted) to the device;
- The device performs the real registration on the backend, encrypting all the http payload (apart from the session token) with its AES key;
- Whatever communication from the device to the backend and vice-versa is now encrypted with AES (including files downloads).
Note: The same AES key is used for the entire session duration (even if performing several http calls). If the device reboots the above procedure starts over again.
Note: at this stage, the only AES cipher supported is AES 128 ecb, which cannot encypt patterns in data.
6. APIs
There is preliminary support for interacting your Things via REST(ish) APIs. These APIs are not yet fully REST compliant (i.e. they are all POST APIs), as we decided to use a unified authentication (via POST) for ease of use and implementation. You can authenticate either via your API Key (you can find it in your Account Profile) or by providing "username" and "passoword".
Get worker messages
# curl -XPOST 'https://pythings.io/api/web/v1/msg/worker/get'
       -H 'Content-Type: application/json'
       -d '{"tid": "5AAF2G126D59", "from":1485021200, "to":1485024400,
            "apikey": "855208e7-b337-tty5d-911a-v4467va31a6d"}'

 ["ts": "2017-01-21T17:54:40.553Z", data:{"luminosity_au": 301},
  "ts": "2017-01-21T17:59:49.906Z", data:{"luminosity_au": 302},
  "ts": "2017-01-21T18:05:00.187Z", data:{"luminosity_au": 307},
  "ts": "2017-01-21T18:10:13.136Z", data:{"luminosity_au": 335},
  "ts": "2017-01-21T18:15:28.651Z", data:{"luminosity_au": 378},
  "ts": "2017-01-21T18:20:38.299Z", data:{"luminosity_au": 394},
  "ts": "2017-01-21T18:25:48.173Z", data:{"luminosity_au": 416},
  "ts": "2017-01-21T18:36:09.646Z", data:{"luminosity_au": 426},
  "ts": "2017-01-21T18:41:23.949Z", data:{"luminosity_au": 408},
  "ts": "2017-01-21T18:46:35.182Z", data:{"luminosity_au": 396}]
Send a management message
# curl -XPOST 'https://pythings.io/api/web/v1/msg/management/new'
       -H "Content-Type: application/json"
       -d '{"tid": "5AAF2G126D59", "msg":"meminfo",
            "apikey": "855208e7-b337-tty5d-911a-v4467va31a6d", }'

 {"mid": "63e671d9-196e-4a3d-936f-5e097e18404c"}
Retrieve a management message's reply
# curl -XPOST 'https://pythings.io/api/web/v1/msg/management/get'
       -H "Content-Type: application/json"
       -d '{"tid": "5AAF2G126D59", "mid": "63e671d9-196e-4a3d-936f-5e097e18404c",
            "apikey": "855208e7-b337-tty5d-911a-v4467va31a6d"}'

 {"status": "Received", "reply": "11664"}